
ADDING VALUE TO ON-DEMAND DIGITAL PRINTS
Embellishments can play a big role in giving prints a high-end appeal, but smaller short-run printing operations can sometimes find that their finishing options are limited due to high upfront costs for specialized equipment. Foil effects are especially challenging because you need not just specialty equipment but custom-made metal dies that are pricey, time-consuming to produce, and potentially useless once a specific project is complete. Still, foil can elevate a simple design into something that generates a far greater return on investment than paper and ink alone. For digital printshops that want the appeal of foil effects without the negatives of traditional foil stamping, Sleeking® may prove to be the ideal solution.
UNDERSTANDING SLEEKING
A type of variable-data foiling, Sleeking is a finishing process that opens the door to customizable, on-demand foiling without the need for expensive metal dies or foil stamping equipment. Unlike hot foil stamping, which uses heated dies to press a thin layer of foil into the surface of a substrate, Sleeking uses specially engineered foils that are designed to stick to a top layer of digital ink, most commonly HP® Indigo or toner-based inks. The foil adheres to the ink and is pulled off the roll, resulting in a clean foil layer laid precisely over the ink design. Because Sleeking foil adheres only to places where digital ink has been laid down, the rest of the paper’s surface remains blank for additional ink. The printer has complete control over these foil designs and can easily change them between runs – no expensive metal dies or wait times needed.
Sleeking requires little equipment investment because many laminating systems, including many models in the Komfi® and GMP® lines, can be shipped from the manufacturing facility with a Sleeking module or have one added in the field. Once a Sleeking module is installed, the only other purchases needed are the Sleeking foils and regular maintenance costs associated with any piece of equipment. Sleeking foils come in a wide variety of looks and effects, from basics like gloss and matte to flashier colors, such as elegant gold and prismatic holographic effects.
THE PROCESS
Compared to die stamping, which usually involves a third party for die production and lead times that can span from days to weeks, Sleeking is simple, quick, and adaptable and can be performed in-house. Even so, the process involves several steps that need to be understood fully to utilize Sleeking to its full capabilities. There are two primary methods for performing Sleeking.
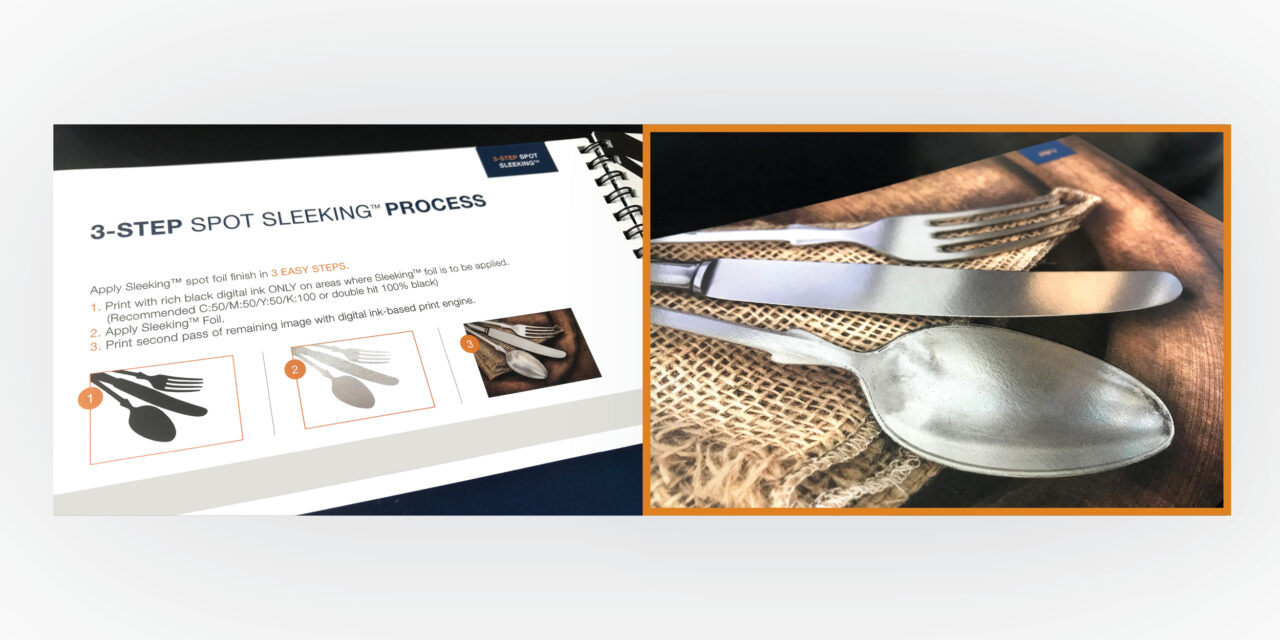
Basic Sleeking (The 3-Step Process)
Perfect for thicker paper stock, the basic Sleeking process provides a crisp metallic look to even the simplest designs. This method has no laminate layer.

- Lay down the layer of digital ink that will be foiled. Because Sleeking foil adheres to any toner-based ink on a substrate, this layer of ink should be the darkest hue of black and include only the design that needs to be covered in foil. Whether this is names on invitations, small artistic details, or accents on an image, the portion of the design that will be foiled should be printed first. This process will necessitate creating separate print files for the foil elements and the rest of the design.
- Apply the Sleeking foil. Once the first layer of ink is dry, the piece can be run through a laminating system with a Sleeking module. The foil is heated and pressed against the print before being peeled away, leaving foil behind precisely where it is needed as it adheres to the ink.
- Print the remainder of the design. With the Sleeking foil now applied, return the paper to the press and print the rest of the design in full color. Any ink that is applied over a printable Sleeking foil will affect the color of the foil, so try utilizing overprinting to achieve specific color effects and increase design flexibility.
Laminated Sleeking (The 4-Step Process)
If you want to add value through specialty laminates or need an additional laminate layer to provide protection from grease, dirt, and moisture, follow these steps.

- Lay down the first layer of ink. In this instance, the first layer of ink will be the full-color design devoid of the elements that will receive foil.
- Laminate the piece with a printable laminate. This layer provides superior protection to both the paper and the printed design. Nobelus offers a variety of printable laminates, from essential gloss to specialty options like our soft-touch Karess®. Use laminates to add dimension to a piece and complement foil accents.
- Print the design that will be foiled. As with the first step in the basic Sleeking process, digital ink used in this step should be as black as the press can manage for best results. This ink layer is applied over the top of the laminate.
- Apply the Sleeking foil. Once the foil is applied, the finished piece will have all the benefits of both lamination and foil.
THINGS TO CONSIDER
Ink should be completely dry before Sleeking foil is applied. While digital inks typically dry fairly quickly off the press, inks used for Sleeking should be set to 400% black coverage, which may necessitate a longer drying time. Dry ink ensures the foil is pulled cleanly from the roll while adhering smoothly and consistently across the entire print.
Sleeking works best with smooth, thicker paper stock. While Sleeking can certainly work on uncoated paper, less ink is required when the paper’s surface is smooth. Whereas smooth paper produces clean results with precise lines, uncoated paper can give Sleeking foil a gritty or speckled look if an adequate amount of ink is not laid down. Because one sheet of paper will be run through the press and laminator several times in the Sleeking process, cover stocks tend to perform better than lighter paper weights.
Rolls of Sleeking foil can be reused. Because Sleeking foil peels away from the roll only in the spots where it makes contact with ink, one roll can be used to foil several print runs so long as enough foil remains for full coverage of the printed area. Simply rewind the Sleeking foil after a run and use what remains on the roll for the next job. This can be especially cost effective when the foil is used for smaller details or many similarly sized variable-data designs, such as foiled names on invitations.
High-volume operations may not benefit from Sleeking. For operations that regularly run over a thousand identical prints in a single job, traditional foil stamping with a die can be the best economical decision. However, printshops that have a focus on personalization and require foiling frequently will likely find Sleeking to be the best solution for their needs regardless of volume.
WANT TO TRY SLEEKING?
Sleeking is an excellent way to elevate designs and add value for your customers. If you’re interested in learning more about Sleeking or want to see some samples, our customer care representatives and solutions experts are available to talk. Nobelus strives to be more than a materials and equipment supplier; we want to partner with you to help make sure your business succeeds. Ask us questions regarding the cost efficiency of Sleeking for your operation and how it can fit into your workflow to maximize your revenue potential.