
ADDING VALUE TO PRINTS AND PACKAGING THROUGH SLEEKING® FOIL
The print finishing industry has access to a wider variety of embellishments and value-add processes than ever before, and consumers in every market have become accustomed to seeing eye-catching designs and special effects on their packaging. While the near endless opportunities for adding value to prints and packaging has proven beneficial to printers and brands, the same trend can also make it more difficult to stand apart from the competition on crowded store shelves.
With the rising popularity of value-add effects and specialty finishes, customization and personalization have become key in creating distinct and creative designs for folding cartons, mail and invitations, business cards, and many other types of print and packaging. One of the most accessible and affordable embellishment options for even the smallest print shop is Sleeking.
Because Sleeking is relatively new in the industry, printers who only recently integrated it into their workflow may worry about their ability to troubleshoot any issues that may arise. This article will look at how Sleeking is performed, what sorts of issues may appear in finished prints, and how printers can correct these issues to ensure each high-value print is flawless.
WHAT IS SLEEKING?
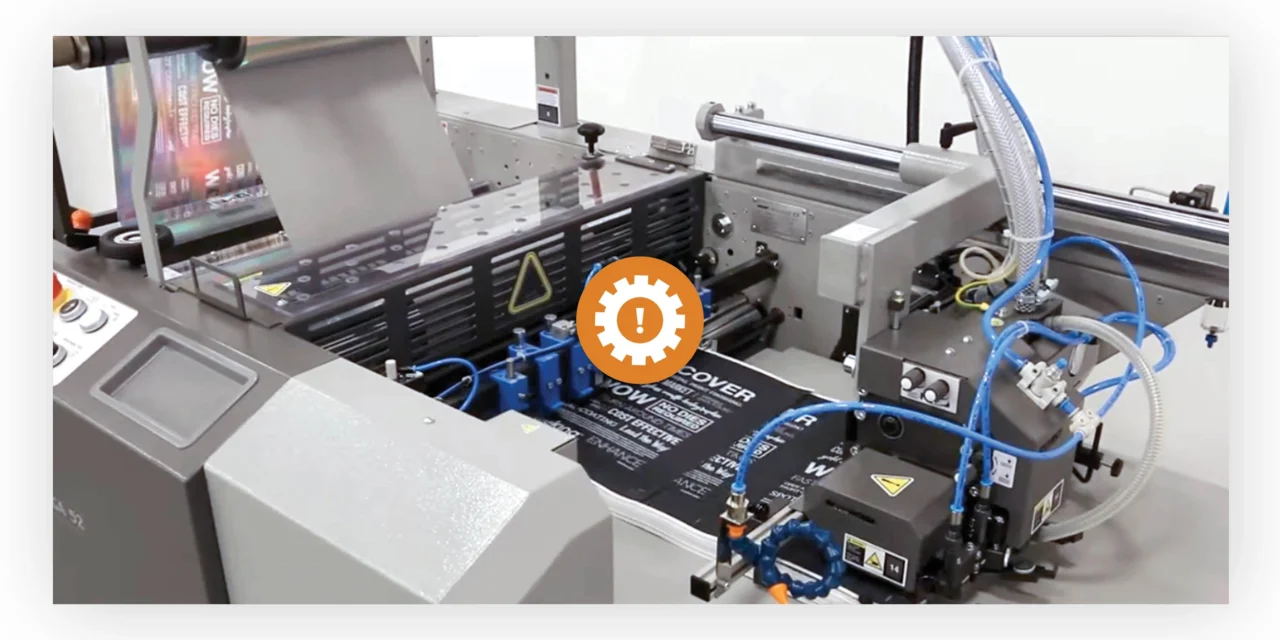
Known generically as digital cold foiling, Sleeking is a foiling method that involves digitally printing a design on a sheet and then laying specialized foil over the ink. When this foil is pulled away, the result is a shimmering, clean foil effect left on only areas with ink coverage. Sleeking foil comes in large rolls that are loaded onto a specialized mandrel attached to a thermal laminating system. Many modern thermal laminators, including those in the Nobelus Equipment Portfolio, can be purchased with or without a Sleeking mandrel depending on the printer’s needs.
Because Sleeking is a multi-step process that adds time and labor to the printing process, printers should verify that the investment will reliably result in higher margins for their products. For printers who see that their clientele values customization and personalization in printed designs, Sleeking serves as an excellent value-add option for a variety of applications. For more detailed information about the Sleeking process, read our post What Is Sleeking?
COMMON SLEEKING ISSUES AND THEIR SOLUTIONS
While Sleeking is overall a straightforward, simple process, every embellishment method comes with its own learning curve and unique set of frustrations. Even printers who are experienced in Sleeking and cold foiling may encounter unexpected issues for unique jobs and applications.
Our in-house technicians have helped numerous customers identify issues in their Sleeking process and find a solution that gets their workflow back on track. We asked them about some of the most common issues they encounter with Sleeking in the field and how they resolve them.
1. Registration
Some printers may encounter issues with registration becoming skewed during Sleeking. This problem is often a result of the Sleeking process’s effects on the properties of the substrate. Paper-based substrates are made up of tiny fibers that lock together to form a sheet. When these fibers are exposed to heat and pressure in printing, lamination, and various embellishment processes, their thickness and even moisture levels can be subtly affected. In a typical print run, a sheet is exposed to each step only once, minimizing the effects heat and pressure have on its fibers.
However, Sleeking requires that a sheet be run through the press and laminator multiple times, increasing its exposure to heat, pressure, and various other forces that could impact the individual fibers. The specific changes may vary based on equipment type, machine settings, and sheet properties. Some sheets may grow as they are flattened or stretched, while others may shrink as the fibers dry out and lose volume. Other factors can include humidity in the ambient environment and the number of times the sheet is run through the equipment.
To minimize registration issues, printers will need to account for the factors impacting their specific run by observing how the registration has changed in the finished sheet and adjusting crop marks accordingly. Many printers limit Sleeking to smaller applications to minimize the amount of change seen during the process. In a similar vein, running sheets landscape instead of portrait helps reduce the amount of time the sheet is exposed to high heat and pressure, reducing the likelihood of shrinking or stretching. Finally, many printers utilize trapping and creeping during the printing stage to prevent registration issues later in the process.
2. Picking
In some cases, small corners and fine edges in the foiled design may be missing in the finished sheet. This issue, called picking, is a result of ink being pulled away along with the Sleeking foil. During the Sleeking process, Sleeking foil adheres directly to the digital ink on the sheet; when the take-up roller pulls the foil through the laminator, it pulls the substrate, as well. When only a small amount of ink is used in this process, such as customized names on invitations or fine details in a design, the Sleeking foil may pull up bits of ink from the edges of the design.
To prevent this from happening, operators have several options. The most reliable solution is to allow the ink to fully cure for 24 hours before Sleeking is performed. However, this solution may be unrealistic for most print shops; our technicians recommend allowing ink to dry for at least two hours prior to Sleeking. Another option is printing a border around the edges of the sheet outside the crop marks. This border provides the Sleeking foil with something else to adhere to as it pulls the sheet through the laminator, reducing the amount of force exerted on the finer foiled areas.
Finally, printers should always ensure their equipment is properly aligned so the Sleeking foil pulls away from the sheet vertically at a 90-degree angle instead of horizontally. The tension of the take-up roller should supply the force that pulls away the Sleeking foil; if the foil pulls away before this point, the tension on the take-up roller may need to be reduced.
3. Wrinkle Lines
Wrinkle lines are long lines that run across the width of large Sleeking applications. This issue occurs when Sleeking foil becomes wrinkled under the laminator’s hot roller due to excessive tension. To remove wrinkle lines, printers should decrease the tension on the foil until a diamond pattern becomes visible in the foil as it crosses the hot rollers.
Another option is to equip the laminator with a wrap-less roller kit with a spread roller to help reduce wrinkling. If deep wrinkles remain in the finished Sleeking application after these solutions are tried, it may indicate an issue with the foil’s quality.
4. Dotting
Sheets printed on a color press are often left with an anti-counterfeit dot pattern printed on the design. This pattern is not visible to the casual observer and typically does not interfere with the printed design in any capacity; however, because Sleeking foil adheres to any exposed ink on the sheet, it will also adhere to these tracking dots. These dots may be eliminated from the design by setting the press to print in greyscale. While this solution works for many types of presses, some printers may need to contact their press manufacturer for further guidance on how to disable anti-counterfeit dots.
On the other hand, sometimes dots may appear over the entire surface of the sheet. Certain sheets are manufactured with a coating that is simply not compatible with Sleeking because the coating interferes with the foil’s ability to adhere only to the desired areas. If a sheet is not compatible with Sleeking due to a coating, printers can laminate the sheet first and then apply another layer of ink over the laminate with the design that will receive the Sleeking foil.
5. Paper Compatibility
Related to the point above, printers should always validate that the paper they use will work with Sleeking foil before purchasing a full order and running a live job. Our in-house technicians recommend selecting 3 to 4 types of paper that have been proven to work well with the printer’s equipment and sending these in for a trial Sleeking run.
For printers who use HP presses, Sleeking requires HP-qualified paper that is 3 stars or higher. Regarding presses from other manufacturers, the operator will likely see satisfactory results with any type of paper so long as it is of high enough quality. Some types of paper may need multiple hits of ink to foil properly, but others are simply not compatible with Sleeking foils regardless of how much ink is used. We recommend testing paper before printing without exception.
6. Ink Coverage
In the past, ink build was a much greater issue for Sleeking, but most modern digital inks can adhere to the foil for clean, smooth results. Printers should generally be more concerned about leaving enough ink on the sheet to produce consistent results with foil coverage. Smooth, coated sheets may need as many as 4 hits of ink to get the desired results, but rougher, less even sheets with no coating may require as many as 8 hits to properly fill the dips and valleys in the paper’s surface.
Best practice is to begin with a smaller amount of ink, test the Sleeking foil, and then increase the amount of ink on the sheet if the results are not sufficient for the application. When using uncoated paper with an HP press, use the Cromalin setting to lay down a larger dot of ink. Printers should keep in mind that prints with Sleeking foil often garner large enough margins to accommodate the added expense of more ink on each sheet.
7. Temperature
Finally, always ensure the thermal laminator is set to a high enough temperature for proper adhesion. The recommended temperature for Sleeking foil is 221°F or 105°C. Certain machines may be calibrated in a way that requires experimentation to achieve the intended results, but the ideal temperature range for Sleeking typically falls between 212°F and 230°F (100° C to 110° C).
WAS YOUR SLEEKING ISSUE NOT COVERED IN THIS ARTICLE?
If we did not address a specific issue you are encountering with your Sleeking process, do not hesitate to reach out to the Nobelus team through phone or email. Our in-house service technicians are highly knowledgeable about Sleeking and thermal lamination in general. They would love to help walk your team through a solution by phone, video, or an on-site visit. If you want to learn more about Sleeking or the Sleeking foils in the Nobelus catalog, our customer service reps can provide valuable insight and information.


